Showing posts with label home DIY. Show all posts

Friday, February 21, 2014

My Forte

Sleepy girl right here.

Last weekend I purchased four solid wood dining chairs off of Craigslist for $35. Total score. We've been needing some solid chairs in our dining room, ones that don't feel like they're gonna fall out from under you. But with great savings can come great tribulations. So this week after Finn's in bed, I've been prepping the chairs for a new coat of white paint. And let me say this, prepping sucks. 

Sanding and sanding and sanding some more. As you can see I couldn't find a mask so I had to go with Rob's bandanna...totally looking hardcore right? But really not at all. Just look at my girly punch. ;) 


So with sanding finally complete, tonight I applied a liquid deglosser that is just an extra step to prep the surface of the chairs before painting. I'm really hoping the finish will last for a long time. Next up will be primer and paint. So I'm looking forward to getting this project done (hopefully next week?) and will share on here the subtle but welcomed transformation..

Earlier tonight, Finn and I went to the grocery store. Now Rob and I are both not fans of grocery shopping. It's usually accompanied with dread. But when Finn is added to the mix, he makes it a lot more fun. Waving at people and spreading his general cuteness all around. He's nice like that.

I remember my first trip to the store with him. At that point I was a strict user of those fancy shopping cart seat covers. But somehow it phased out quickly and now I just plop this boy in his seat and buckle him up. Yeah, sometimes he puts his mouth on the gross handle, and I say a desperate prayer under my breath, but overall he does well. So much to see in the grocery store...AND he can help pick out his food, hello...who doesn't like that?

Me: Vegetable turkey dinner, Finn?

Finn: No thank you mother dearest, I'll take that box of banana cookies instead.


He's "borrowed" that pink toy cell from his cousin and love-love-loves the thing. I tried taking it from him after getting out of the car but he had an anaconda grip on the thing. So into the store it came.

So anyway, I guess my type-A personality wishes I had taken more photos this week or did a quicker project to share with you, but I've got nothin. But that's alright. Random posts tend to be my forte. My cup of tea crancherry.

I'm ready for you weekend...off to bed for now. Happy Friday, friends!

And a happy birthday to my beautiful sees!

Friday, February 7, 2014

Getting Close!

Well I wanted to share the latest and greatest of this bathroom mini-reno. It's looking good. I think back to what it was and bleh...I'm just happy we're moving forward.

Let's remind ourselves with a pic, shall we?


Gah, it just screams high school locker room bathroom to me...not very masterful. at. all.

Here's a prior progress shot, you can see how the paneling was painted gray and the top trim was painted with a fresh coat of white...but the walls and ceiling still needed to be rolled with the white. You can see the off-white goodness showing in this pic...


And here's how she's lookin now...


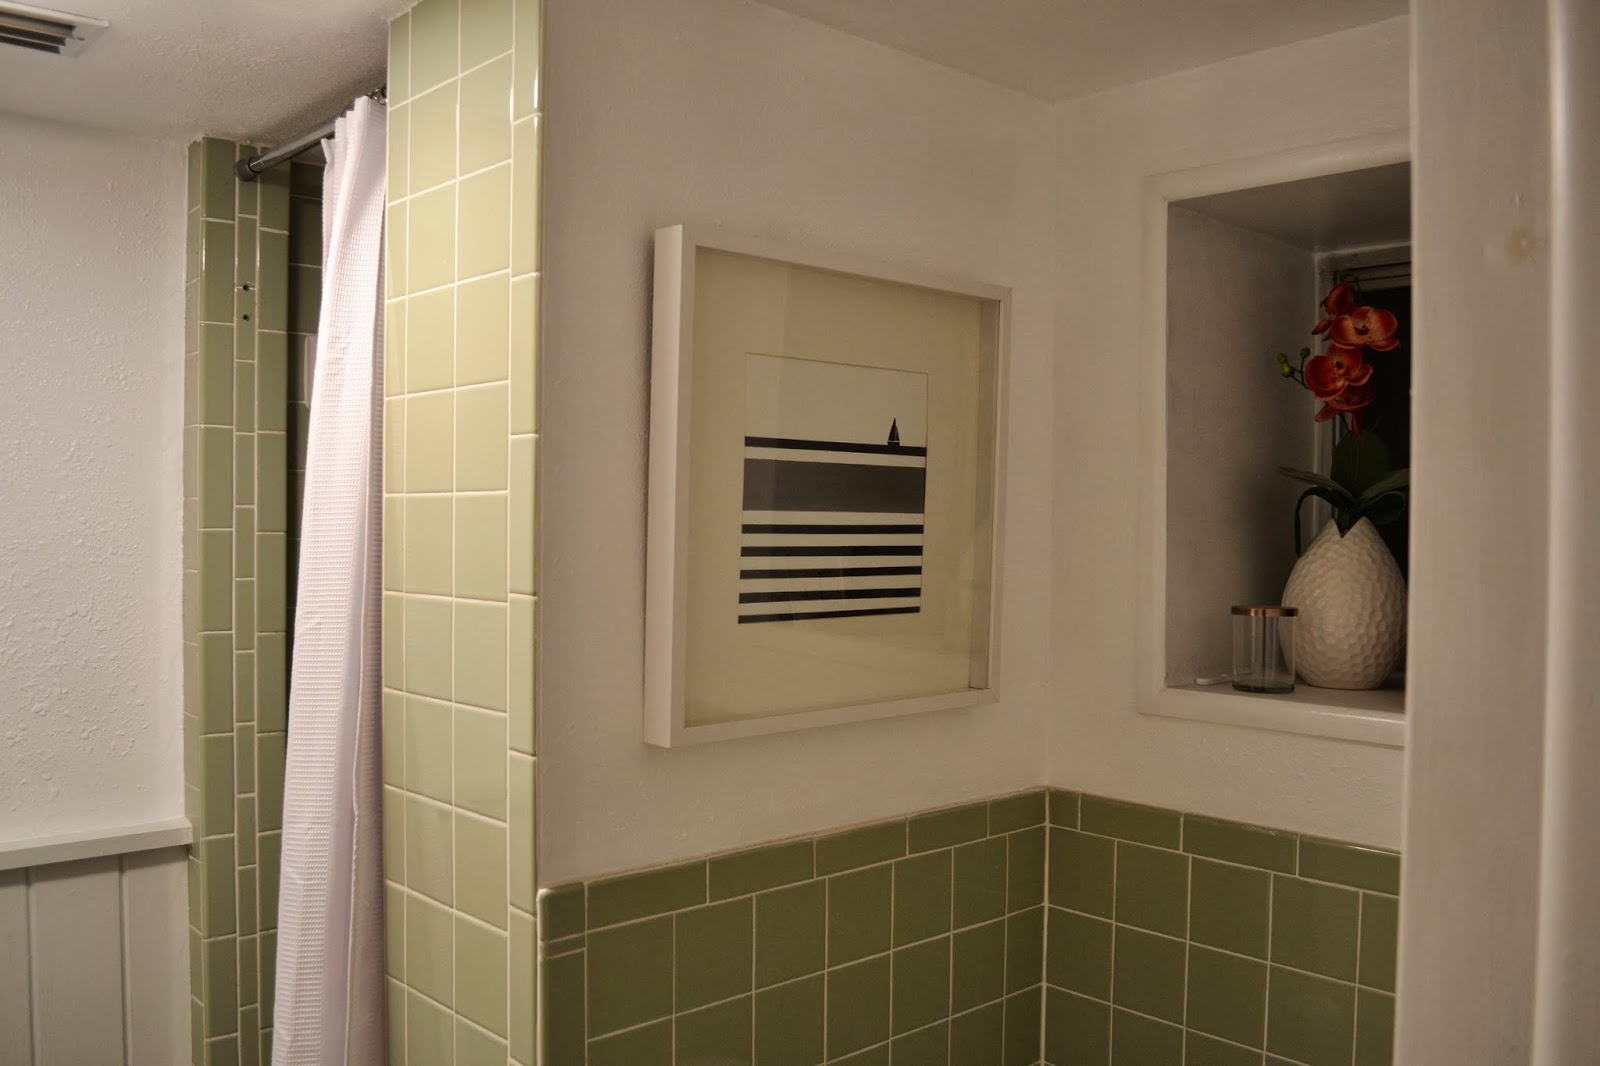
I finished painting two coats of white on the walls and ceiling, a major upgrade much more noticeable in person. Also finally hung my homemade art piece...


I also ordered a new grill and light cover for our exhaust fan/light. For $24 it was a much cheaper route to go rather than updating and purchasing a whole new fan. Here's a side by side comparison of the two...um...goodbye yellow nastiness!


The light is still dim in here which should be fixed when we get the fixture above the sink up and at em...


I was also on the search for some towel hooks. I picked up these adorable things from Anthropologie. The store that I can only afford to buy hardware from. ;)


In these pics it still looks pretty bland and in that "in progress" phase, here's what's left:

-- hang up teak mirror cabinet (storage, yes please!)
-- put teak bench under cabinet
-- hang light fixture above mirror
-- arrange mirror to look like a captains mirror (similar to something like this)
-- hang towel hooks

It's coming along, slowly but surely. And my favorite part? The new view from my bedside...


It's getting there. Happy Friday!
Friday, January 31, 2014

Finally! A Bathroom Update

Soooooooo yeah, it's been since September since there's been any update in our little tiny master bath. Hangs head in shame, shame, shame. So here's a little update...and I gotta say, I think my momentum is back.

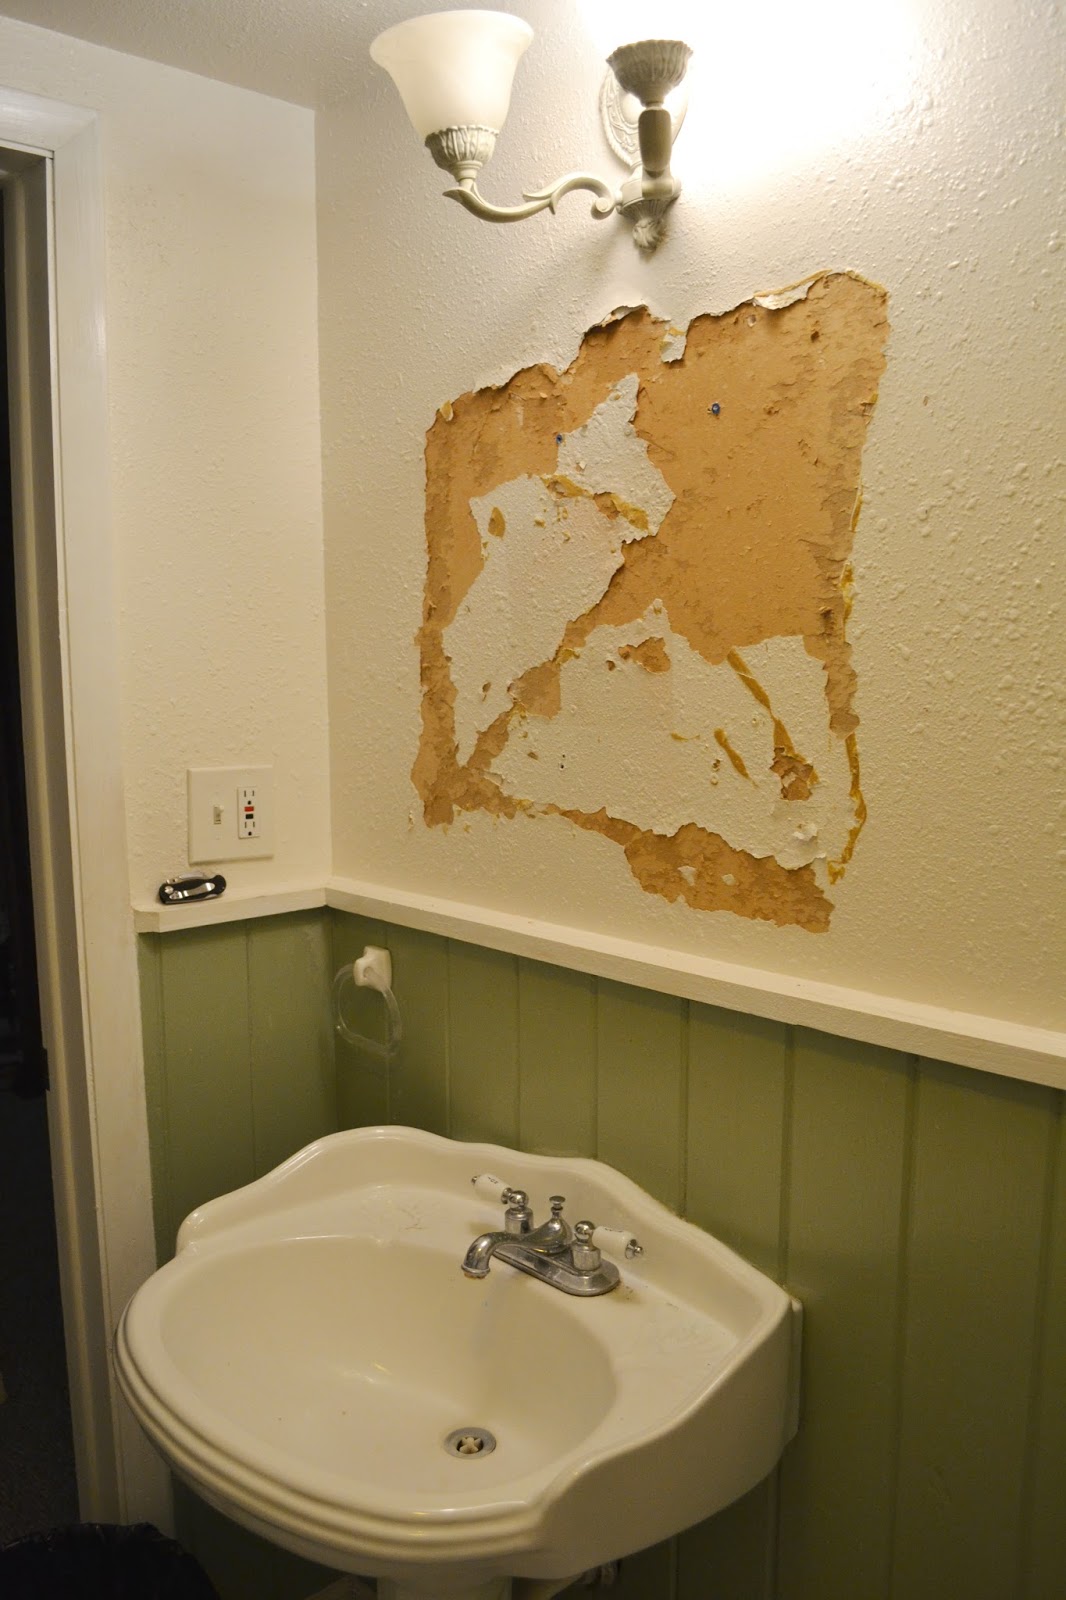
So I think this is where we left off? I'm not sure...but it was pretty hideous. An off-centered mirror peeled off the walls (since it was glued) and a light fixture that's also off-centered...and the paneling painted in a shade of olivey green.


And now, the paneling has been painted a pale gray (BM Moonshine), and I decided it's about time to get our mirror hung up on the wall. (main reason for doing this step now, as you can probably see the walls still need to be fully painted, is that we needed to hang it so we can determine the placement of the new light fixture)


So using some wrapping paper, I traced and cut out the shape of the mirror and also punched the holes on the paper marking where to drill my holes.


And blamo (New Girl, anyone?) the mirror is up...


Still lots to do in here...I want to spray the frame of the mirror in oil-rubbed-bronze...and I want to make it to appear like a captains mirror (like this). Also need to install the new light fixture, which will require some major shimmy-ing due to the crazy off-centeredness of the current light fixture.


But I just gotta bask in the fact that we finally have a mirror back in our bathroom. It's a very odd thing to not have in your main getting-ready bathroom. I've been doing my hair and makeup (not much of a production, I promise) in the dim lighting on the floor of our bedroom. So I'm ready to see my face in good light and no longer have a case of makeup on my nose or stuff in my teeth. ;)


Yep, it's coming along...I feel like I'm back in the saddle with this bathroom...I'm so tired of it not being complete. Kickin it into high gear baby. 

PS...tomorrow's the day this site will be changing over to the NEW web address, www.winterheights.com!

Tuesday, November 26, 2013

Kitchen Upgrade - Wall Shelves

Finally an upgrade to this wall in our kitchen that I've been trying to avoid direct eye contact with for years now. :)


Blessed shelves have entered the building. These shelves and brackets are from my second home, Ikea. But let me go back to the before. In this space we used to have a random wire rack that Rob and I acquired at some point. Maybe it came from my first apartment with my friend? I'm not sure. But overall it's been around for a while, sticking out like a sore thumb.


As you can see, we used it to put our microwave and toaster oven on. Also recycle would kind of build up down there as well. The plan is to purchase a new microwave that hangs over our stove, and then to put the toaster on the countertop where those metal tin cans from the above used to be. The true motivation for this project (besides just making the space look better) is in the name of baby proofing. And stretching our space in this little galley kitchen doesn't hurt either.

So I started by taping everything out. Just to get the measurements and the placement.


This is why it takes me forever to get moving on hanging stuff...it's one of my least favorite things to do. All the measuring and leveling, bleh! And hanging stuff like art and shelves feels like a commitment similar to getting a tattoo. No take-backsies...or at least that's how it feels in the moment. So all that to say again, it can take me a while to hang stuff.


But once all the tape was up there and the holes were marked, things started moving. Still some griping, but thankfully we got the things up there and looking pretty shiny.


SUCH a welcomed difference...


I'm sure that the items on these shelves will continue to evolve. I kinda just threw this together using various stuff around the kitchen. That piece of wood is actually from when I had to trim down these shelves and I'm thinking of painting a silhouette on there. Not sure exactly what, still mulling that over, but I'll be tackling that soon.


So the plan is to have our trashcan tucked under these shelves, but the exciting part is that we're looking to get a new trashcan. (never thought I'd say the words "exciting" and "trashcan" in the same sentence) I found a rectangular, stainless steel (fingerprint-proof) trashcan with clean lines that don't quit that we might get.


But for now I'm just basking in the newness and beauty of the view.

Oh and here's our big boy walking around Lowes shaking little packages of screws while daddy was looking for anchors for the shelves...


Love our sweet boy and so excited to experience the holidays with him. And I'm SO ready to splash some Christmas decor up in this house.

Friday, September 20, 2013

Master Bath Mini-Reno Mini-Progress

Let me first say that there are no pretty "after" pictures to look at in this post. Nope, we're just not there yet. We're in that lovely chaos stage where everything is quite. a. mess. A hot one. 

I left off where I had removed the cabinet on this wall leaving us with 4 holes to patch...


So I patched those up real quick...just needs some sanding and some texture (all of our walls are covered in that orange peel texture) and then it'll be ready to paint, well kind of.


Speaking of paint! Again, here is the main paint inspiration pic that shows what I had in my head...


So I started to paint some of the white on the top portion and you can really see the difference of the previous off-white color and the new white in the below few pics. I also played with some samples for the bottom paneling. The gray colors I was going back and forth on were Benjamin Moore's Moonshine and Gray Horse. What's funny is I had painted Moonshine on there a few days ago and I was like definite no. So then I got the next darker shade which was Gray Horse. Once I got Gray Horse on the wall, I realized Moonshine was the one.


Here's a close up, Moonshine on the bottom right. You can see Gray Horse on the left. I realized I wanted to keep it light and airy because the tile is so dark and a little gloomy. When looking through my fan deck, I landed on these colors because they have the slightest hints of green in them (the green in Gray Horse stands out a lot to me) and I liked how that would complement the tile that we're not looking to smash down just yet. Please note the lighting in here is terrible, so these pictures all cast a yellowy tint. The lighting is a huge thing I'm excited to update to freshen this place up.


I'm liking how that white is going to freshen these walls and ceiling up. 

Some progress was made on the mirror side as well. Here's where we left off, Rob has pulled off the glued off-centered mirror.


He then scraped off the loose paint/glue...


And then I patched the holes...they need another round of patching though because of the depth of these holes. I know it's hard to tell but there were literally 10-15 holes in this area. Some anchors were actually in the wall and then painted over. ?????????


Here's a good shot of the full chaos. Pretty, right? :)


So what's next? I'm going to buy a can on Moonshine so we can officially say goodbye to that green paneling. The mirror area and the other areas that have been spackled need to be sanded and then retexturized. We also need to figure out how to move the light fixture opening over a smidge so it's centered and then patch the previous opening. Then after allllll that, I'll paint the walls with a fresh coat of white and lots more.

But for now, we'll live with this chaos. Plenty more updates to come.

My friend and I visited our newly opened West Elm yesterday, I'll be posting pics from that soon. Happy Friday!

Friday, September 13, 2013

Master Bath Demo Time

How about a little bit of demolition to cap off the week? Yeah, demolition might be too strong of a word for this, but the important thing is our master bath has our attention. I bought some white paint to freshen up the top off-white portion and ceiling in this room and it has spurred on some other things that need to be done first. 

Like this mirror...


This is really the only before shot of this mirror I could find. My sweet baby boy. But all you need to know is the mirror is off centered from our pedestal sink and needs. to. go.

I had mentioned this to Rob to help me with because I knew it would be a messy job needing a bit of muscles and skilllll. And then I get this picture of him later in the week while I was at work...


Lol, to protect himself while pulling the mirror off the wall he came up with a mask. Out of a t-shirt and welding goggles. Whatever works, right? :) Those welding goggles kill me, haha. He taped up the mirror and started pulling pieces off. This is our second (but much smaller scale) experience with ripping GLUED mirrors off our walls. And I gotta say, gluing a mirror to a wall is not the thing to do. It's just not right, people!


It's left us with a bit of a mess, but nothing our previous mirror removing experience can't handle. Our next step is spackling, then sanding, then re-texturizing. I don't think that's a word, but oh well.


Here's a good shot to see how the mirror was off center AS WELL AS the light fixture. Bleh...


So then I got the easy job of removing one of the most annoying cabinets ever. I'm not sure how long this has been going on, but this cabinet door will not. stay. shut. The magnet kept coming off and I can't tell you how many times we've almost pierced our heads on the corner of this thing.


The other annoying thing is the inside shelves are rounded at the ends so it really wasn't great storage, things always fell out of it. Needless to say, I'm happy to say good riddance.


Yeah, this was much easier than removing the mirror...but oh so satisfying.


So many holes in these walls, and pretty big ones from all the anchors. I think I lost count at 14.


Gah, the lighting in here is so yellow. Here's the white paint I plan on using for the top portion.


I have already purchased a new wall cabinet found in the as-is section at Ikea for 50% off, woot woot! And here's a little glimpse into what's mulling around in my head for the rest of it...


I'm thinking of doing a fresh coat of white for the top portion of the walls/ceiling and a very pale gray for the paneling. I'm loving the look of a round mirror over the sink and then DIY it to appear like it's hanging like the pics above. For the sconces, I'm thinking of either doing industrial or nautical styled. Also will later think of some simple bathroom-friendly art to fill a few spots.

Well I'm just happy that we're looking at this room now. We use this little bathroom so much, it'll definitely be nice when it's a little a lot more pleasing to the eye. And one day maybe we'll get to gut the thing and start fresh. But for now I'll celebrate our little mini reno.

Happy Friday!

Monday, March 18, 2013

Searching For The Perfect Paint Color

I'll be the first to admit that I've made many mistakes when choosing a paint color. Prior to moving in, I did the right thing and bought testers of all the paint shades I wanted for each room...yet in the end I tested only ONE. The story is, I had only one paintbrush and after I put one tester on the wall I went to rinse off my brush for the next color and discovered our water hadn't been turned on yet. So I just said, heck, the colors will be fine...and bought the gallons of paint the following day. Only to end up loving 3 out of the 5 colors.

My lack of patience can be laughable sometimes...

So besides the obvious tip of buying a few testers (they're usually less than $3!) and actually using them...here are some other tips to avoid that smack your head moment when you realize you made a big...sometimes expensive...and most certainly time consuming, boo boo.

Benjamin Moore

When viewing the swatch, hold it the way of the surface you'll be painting...

For instance, if you're painting the wall...hold your swatch up vertically to view the color. It's amazing how the way you hold the swatch truly affects the color due to the way the light hits the surface. Same goes for painting the ceiling. Hold the swatch above you to get a truer idea of the color.

To avoid unwanted undertones, grab a swatch of the unwanted color and compare...

I've been the victim of choosing a color that I thought was what I wanted...but then I got it on the walls and crap...a sneaky undertone comes out and it's not at all the color I was going for. How to avoid this? If you have an inkling that an unwanted color may be in your swatch, or if you're just trying to avoid a certain color...find a swatch of the unwanted color and place it next to your desired swatch. This can help bring out any sneaky undertones.

For instance, I bought a gray once only to find out that there was a tonnnn of blue in it. I was originally looking (don't laugh Rob) for a true gray. No undertones. Well, with the swatch in hand, instead of just imagining what it would look like against the white trim (which white doesn't help unveiling undertones) if I had grabbed a blue swatch and placed it next to the "gray" one I had in hand, the blue undertones would have been unable to hide. Undertones can be seriously sneaky. You gotta trust your eye. And if you don't trust yours, ask a friend!

Paint the tester on various walls of the room...

Lighting is huge when it comes to color and how it appears. I've learned to put the tester on various walls to get the best perspective of what the color would look like. And also to view the painted area in the daytime as well as at nighttime. Again, lighting can change a lot.

So I'm definitely embracing these ideas while I'm dreaming of painting our dining room/family room...and possibly our kitchen.

I'm also tired of feeling restricted to the colors offered at my local home improvement store, so I did myself a favor and ordered myself a Benjamin Moore fan deck. Yeah, with 1232 colors. It's odd how giddy this makes me feel. I've heard it time and time again how awesome Benjamin Moore colors are and I'm finally convinced. Since we don't have a Benjamin store around here, I plan to use the swatches to be color matched.

I just started browsing their colors and here's a few that I fell for...


Anyone have any painting regrets? At our last home, I had a lime green living room, an orange sherbet office, and a light blue room with a royal blue accent wall. I. am. not. kidding. I don't completely regret it, but my goodness, it was a lot of color. Anyone else drawn to more vibrant colors like me? I want to paint a room that Majestic Violet soooo bad!

Saturday, January 5, 2013

Nursery Reveal!

HELLO DUE DATE!!!

Due date has arrived and it just so happens to be the day I'm finally able to share Finn's finished room.

Are there things that I still wanna do in his room? Of course! But I'm letting go...just wanna focus on getting this boy out safely and in our arms.

So here we go. I'll start with my original mood board I created for his room back in the day.


I love the calmness of the room and the mixing of different woods...from the gray ash crib to the natural wood to the brown/black wood. I didn't want it to be too themey. Nautical is a favorite of ours, however, I wanted to be able to include whatever we wanted...a mix match of accessories that we either had or found.

Without further ado...here's the finished room in the flesh.


Starting at the top of these shelves is a dinosaur bank of Rob's when he was little. I just painted it a brighter color. Lots of homemade art was given to us...the narwhal painting made by my friend as well as the ship in the bottle made by another, love them both. And Rob gave Finn his favorite Batman figure. The key hook was a gift given to me a while ago from Anthropologie.


Here's another art piece given to us...love it. The owl is a bank I found at Ross, the white elephant was a white elephant present I was given that I...fought for, lol...to say the least. I knew I would put that thing in Finn's room.


The banner is from Land of Nod. It was inexpensive too...I didn't feel the need to make this by hand to save money.


For detail on the crane mobile, here's a prior post about that.


This was a gift just given to us yesterday, lol, and we love it so much. Rob has a obsession/fear of squid/octopi. We won't keep this guy in the crib of course when Finn is in there, but we think it might be his little buddy when he gets older...if not it'll definitely be Rob's little buddy. :)


This wardrobe belonged to my friend, Larsen, and I'm so happy to make good use of it. It's the absolute best for storage...honestly, it's amazing how much we can fit in there.


Here's the simple rope curtain tie back I made...


To keep the rope bound together, I tied some twine/cord around it really tight...


Then literally just screwed in a hook right into the rope.


Lots of homemade art made by this mama... (for details, see this, this, this and this post)


Hopefully Jack won't have too much replacement syndrome...but he definitely looks concerned here. :)


Insert humongous sigh of relief to be done with this room...the laughable part being that perhaps Finn won't even be in there for a while. But we'll see. Regardless it feels so nice to peek in this room from time to time. I could just sit in there and unhealthily stare at it forever...hah.


There you have it...a finished room for our boy expected any day now. January 5th is passing by, so we'll see when his birthday will be. I'm secretly holding out for January 13...lol, I know it's crazy, but 1/13/13 is a cool birthday! AND it's my half birthday as well, lol. Oh numbers. But honestly happy with whenever he wants to come, just praying for God's continued peace and a safe delivery of a healthy baby boy.

Love to you all!

LinkWithin

Related Posts Plugin for WordPress, Blogger...